Back when we added this feature, we created 16 vehicle types since we wanted to give you a wide variety of avatars to choose from. We still have a long wish list of vehicles we want to create and add. In the coming weeks, we plan to add a number of new vehicle types, so stay tuned as we roll them out. These will all be fun additions to our vehicle avatar choices.
Below, we give a brief "behind the scenes" look at the process we use to create these vehicle avatars.
Designing the Avatars
Idea Phase
Cars, bikes and trucks are rich areas for ideas, especially when you consider not just the contemporary offerings, but all the vehicles throughout history. There are also appearances in popular culture to add to the richness of choices. Thus, coming up with the initial ideas is easy, but there are some limitations to consider:
- Variety - we do not want to have avatars that are highly similar, so we try to find a "category" or "type" that is distinguished from the others.
- Copyright - as much as we would like to offer avatars like the Batmobile or other vehicles from popular culture, we also very much like not being contacted by lawyers with cease-and-desist letters or seeking royalty payments.
- Priority - we needed to consider which vehicles will have the most appeal and interest for players.
Sampling Phase
Once we have settled on the type of vehicle, we hunt around the Internet (usually using Google's image search) for examples fitting this genre. We do not use these images directly, but they serve as inspiration for our avatar drawings. We look for images showing a nice clean side profile as that is how all our avatars appear. We sometimes need to horizontally flip the images as our avatars face to the right.
Drawing Phase
We use the open-source program Gimp to do the design (it's like Photoshop, only better). The trickiest part of the design work is planning the "layers".
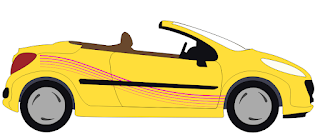
We use the Scalable Vector Graphics (SVG) format to render the avatars on our website and Gimp supports this with its "path" feature. The SVG format is more flexible that using plain old GIF, PNG or JPG images and it allows us to more easily provide the customization feature. We actually use multiple SVG images, one on top of the other, so that we can "insert" an accessory or change color. For example, look at our convertible avatar below:
Notice the black door guard band across the body. When you change the color of the car, we want only the body to change color and not the door guard, i.e., we want this:We achieve this by putting the body drawing on one layer and the door guard on a layer above it. Then we can change only the body color, redraw and the black body guard is rendered over the body's yellow coloring.
This layering approach is a common pattern used in most design software, including Gimp, so we are able to create each SVG layer in its own Gimp layer. Notice that the rear view mirror of the vehicle is also in the upper layer and gets drawn over the body color too.
We also have to consider the customizable accessories for the vehicle when we plan out the layers. For example, adding purple stripes like this:
means we need another layer between the body and the door guards since you probably would not paint stripes over the rubber door guard in real life. When a vehicle has lots of different accessories, the layer planning gets more complex.Coding Phase
We then use the "export path" feature of Gimp to output a separate file for each SVG layer. These files will become part of our source code. Inside our code, we maintain a list of all available vehicle types and what accessories it has. We add the new type to that list, its accessories and include the names of all the new SVG files. We also set the game cost for the vehicles (in "ride points") and decide at what point in the game the new vehicle will be "unlocked" and available. Vehicles get unlocked in groups as you reach milestones, so here we determine which group it should be in.
We have a special vehicle test page which allows us to view the result and visually verify it before we make them part of the next game release. An important part of this visual verification is to make sure the left-facing, mirror image looks correct. In our two-player game, we render the player's avatar in the default right-facing view, but their opponent is mirrored so that the avatars appear facing one another.
Conclusion
We hope this glimpse into the design process for our vehicle avatars was interesting. It can sometimes be a tedious chore to draw out all the layers of a new vehicle, but it is always exciting at the end when it all finally comes to life as a new avatar choice in Plates Across America®.
If you have never tried our game before, please do here:
Happy Travels!


No comments:
Post a Comment